Guardian/Ravager Ultimate PVE Tank Build and Strategy Guide in Aura Kingdom
1. Why Guardian/Ravager?
The answer is TANKY TANKY BOOM BOOM!!! Guardians generate high amounts of malice, billions of monsters will all aim directly for you. (YAY!!!) This is when you use your skills for maximum efficiency. There are also the combo moves which are always fun and appealing to the eye.
2. TANKY TANKY BOOM BOOM - skill overview
DEFENSIVE:
Guardian:
- Mirrored Shield... reflect X amount of damage (damage scales to your level) back at attacker.
- Absolute Defence...reduces damage taken by 75% and reflects back 150%, grants immunity to stuns while activated. Can block linear red carpet from damaging party members behind you.
- Phalanx...reduces received damage of every attack by X amount of damage (reduction scales to your level). With Revitalising Wall mastery, this will have a 25% chance of healing you X amount when attacked. This will be discussed further below.
Damage reduction AND reflection? You know what to call that? TANKY TANKY.
Note: Absolute Defence cannot block circular red carpet or Noripan's Bombs.
OFFENSIVE:
Guardian:
Note: Absolute Defence cannot block circular red carpet or Noripan's Bombs.
OFFENSIVE:
Guardian:
- Sword Slash...deals damage, AOE (area of effect), and reduces damage taken by X amount.
- Shield Bash...generates high malice, your strongest skill, stuns target. Single target, but can become multitarget with use of mastery.
- Thunder Cut...generates high malice, AOE, slows target move spd by 30%
- Terrifying Roar...generates continuous high malice to all enemies within range.
- Flame Slash...long-ranged attack, does damage over time to all enemies it passes through
- Soaring Slash...gap closer and my favourite move. It does a high amount of damage and charges the ravager's rage bar the most out of all the ravager skills.
- Tornado Spin - which most of you would know as "Round and Round" or... "that stupid ravager skill". Does super dooper high AOE damage and converts 1% damage dealt into HP.
Combine this with the Rage bar mechanic (Tyrant's fury 1,2,3,4 charged by using ravager skills) and you will get a BOOM BOOM
----------------------------------------------------
LEVEL 50-60
----------------------------------------------------
The options listed are in the order of personal preference, Option 1 > Option 2 > Option 3 and so on.
3. Build/ Envoy/ Masteries
----------------------------------------------------
LEVEL 50-60
----------------------------------------------------
The options listed are in the order of personal preference, Option 1 > Option 2 > Option 3 and so on.
3. Build/ Envoy/ Masteries
A. Build
Guardians have an automatic MAX HP +20% when they reach level 3 from starter envoy path. So why not take advantage of this?
FULL HP AND FULL SPD!!! What kind of shield would you be if you had low hp? You would just get 1 hit or piled by mobs to death. At level 50, your gear will take care of the rest. As mentioned earlier, phalanx will be our bread and butter... but it only lasts for 20 seconds. But a cooldown of 40 seconds?!@#@! This is where spd comes in. At max capped spd (50%) we will be able to cast phalanx continuously. After SPD cap is reached invest remaining points into DMG.
Stat at level 51:

Stats at level 56:

Note 1: No buffs are used whatsoever, and armour are not fortified, most crafted armour are 110% (sadly)
Note 2: DEF may seem low, but by following masteries of this guide, can easily survive OT,WT, GC dungeons (hellmode) and level 80 Zaahir.
B. Envoy Path

This is only a guide, and not a bible. You can follow it if you wish to but you don't have to. Feel free to mix it up and experiment with other envoy paths.
1. red = move spd, helps earlier in game in main quests and also dodge circular red carpets
2. blue = Get access to Will To Live. Dmg taken -50% for 8 seconds when your HP drops below 25%
3. green path = get access to Intimidating shout, reduces DMG by -10% for 10 seconds to ALL enemies around you
4. yellow = get acess to Malicious Stance (malice +50%) and Taunt (every attack generates huge amounts of malice) to generate more malice, so those over powered DPS or bards cannot steal your aggro. You will have to go through combo move cyclone slash which does a pretty decent amount of damage and also decreases target's dmg by 10% for 10 seconds...not too shabby. Blade of Darkness is another combo moves which reduces the target's defence proportional to your level. It also does a decent amount of damage. And by decent..
5. Currently level 56, so not sure yet.
Option 1: Keep your cool (dmg taken -75% when stunned) - useful for level 55 dungeons especially Ozymand Temple.
Option 2: Both Mirrored Shield Masteries
Option 3: Third Combo move, Wind Slash stuns enemy and looks promising, but needing to go through + crit rate paths.
NOTE: Combo moves have i-frames, invincibility frames. This is when enemies cannot attack you while the animation is being performed, similar to when you use eidolon ultimate moves. Its great to use if you feel lazy dodging a circular red carpet.
C. MASTERIES

Reminder: The options that I list are in my order of preference, Option 1 > Option 2 > Option 3 and so on.
General
Option 1: Booming Shield Bash (very reliable group stun, however it is highly recommended to buy green mastery from class master in Navea).
Option 2: Burning Air Slash (Target -8% dmg)
Attack Spec
Option 1: Zeal (every hit has a chance to do double DMG)
Option 2: Focus (+5% Spd), can also use Boost (+3% spd, dmg -2%)
Advanced Skill
Revitalising Wall (25% chance of healing when attacked - amount healed proportional to level). this is an IMPORTANT MUST HAVE skill if you want to survive in your dungeons. When you combine dmg reductions, this heal well exceeds the dmg done by enemy and heal you instead. You can stand in toto's spinning blades, Adracei's green poison thingy mabob, Talen's lava and even Zaahir's lava (up to level 80 Zaahir) and heal instead of lose hp. ALWAYS KEEP THIS SKILL ON!!! with 50% spd, it will be a permanent buff, i.e. you can refresh it when it runs out. Although the healing ability says 10 seconds duration, it lasts for 20 seconds.
Defense Spec
Option 1: Unyieldingness (recovers 1% of hp every second for 10 seconds, can only be activated every 30 seconds), this is where your HP pool comes in. If you have 40,000 HP (pretty likely at level 40-50 ish) you will heal 4000 HP every 30 seconds. Not that you need this when you have revitalising wall, but its reassuring as it acts as a safety net Furthermore, you can get mastery upgrades which increases the heal time. Green Mastery increases heal to 15 seconds, every 30 seconds. This means you will be healing 1% of your MAX HP every second for half the time.
Option 2: extreme speed (increases move spd), this will help you stay ahead of party and generate malice to group mobs together.
Option 3: courage (increases MAX HP and reduces DMG taken), this is unnecessary because of revitalising wall, but if you are having trouble, you might want to try this
Tactical Spec
Your choice really, depends on what your party uses as well. However, the following are more useful than the others.
Option 1: Organised Sabotage ( 25% chance to decrease target's DMG by 10%)
Option 2: Break Defence (25% chance to decrease target's DEF by 10%)
Option 3: Ambush (25% chance to decrease target's SPD by 10%)
Special Skills
Option 1: Best Defence (if lacking in def)
Option 2: Omniscience( if lacking in spd)
Option 3: Sky Shatterer (fortifies Cyclone Slash combo move, 40% chance to recover hp while being attacked for 10 seconds)
Note: Do NOT use Deep Blue, as it reduces your malice.
4. Gear
Reminder: The options that I list are in my order of preference, Option 1 > Option 2 > Option 3 and so on.
Armour
Go Full Requiem for armour (High boost to DEF, SPD, HP and EVA, preferably use Spidery or Guardian cores).If you find youself lacking in defense still, you might want to try to fortify your armours. If you fortify your armour pieces to +9, you will receive an additional -3% crit dmg taken. May not seem much but with 5 pieces, the effect will add up. At +15, you receive extra +2% malice from each piece, making a total of +10% malice. However, malice from skills and envoy should already be enough.
Leo Set for accessories (gives you huge boost to SPD and HP, bonus EVA but meh).
Trophies
Option 1: Lestaro's Mired Heart (yellow) - gives high boosts to SPD, HP and DEF....Being attacked has a 20% chance to recover 3% of MAX HP!!!! "can only occur 5 seconds". High HP pool strikes again
Option 2: Asheara's Magicked Scales (orange) - opportunity for core, high boost to SPD and DEF. HUGE HUGE HUGE bonus to HP
Option 3: Asheara's Crystal Scales (green) - high boost to SPD, HP and DEF
There are two trophy slots, so you may pick any 2 out of the 3 options. The orange and green Asheara's can be used together, the buffs stack because they're different items. Option 1 and Option 2 are recommended.
Weapons
At level 50, you have two main choices, Yellow or Crafted.
Guardian main weapon:
Option 1: Grass Kingdom's Sword of Bravery. It doesn't match my outfit but it has great stats, boosts DEF by additional 5%, increases Thunder cut's DMG by 25% and "every attack has 8% chance to recover 2648 HP"...which happens very often if you use tornado spin on a mob.
Option 2: Conqueror's sword and shield (orange crafted). Not recommended but if you have a spare weapon core that you think is good, feel free.
Note 1: No buffs are used whatsoever, and armour are not fortified, most crafted armour are 110% (sadly)
Note 2: DEF may seem low, but by following masteries of this guide, can easily survive OT,WT, GC dungeons (hellmode) and level 80 Zaahir.
B. Envoy Path
This is only a guide, and not a bible. You can follow it if you wish to but you don't have to. Feel free to mix it up and experiment with other envoy paths.
1. red = move spd, helps earlier in game in main quests and also dodge circular red carpets
2. blue = Get access to Will To Live. Dmg taken -50% for 8 seconds when your HP drops below 25%
3. green path = get access to Intimidating shout, reduces DMG by -10% for 10 seconds to ALL enemies around you
4. yellow = get acess to Malicious Stance (malice +50%) and Taunt (every attack generates huge amounts of malice) to generate more malice, so those over powered DPS or bards cannot steal your aggro. You will have to go through combo move cyclone slash which does a pretty decent amount of damage and also decreases target's dmg by 10% for 10 seconds...not too shabby. Blade of Darkness is another combo moves which reduces the target's defence proportional to your level. It also does a decent amount of damage. And by decent..
5. Currently level 56, so not sure yet.
Option 1: Keep your cool (dmg taken -75% when stunned) - useful for level 55 dungeons especially Ozymand Temple.
Option 2: Both Mirrored Shield Masteries
Option 3: Third Combo move, Wind Slash stuns enemy and looks promising, but needing to go through + crit rate paths.
NOTE: Combo moves have i-frames, invincibility frames. This is when enemies cannot attack you while the animation is being performed, similar to when you use eidolon ultimate moves. Its great to use if you feel lazy dodging a circular red carpet.
C. MASTERIES
Reminder: The options that I list are in my order of preference, Option 1 > Option 2 > Option 3 and so on.
General
Option 1: Booming Shield Bash (very reliable group stun, however it is highly recommended to buy green mastery from class master in Navea).
Option 2: Burning Air Slash (Target -8% dmg)
Attack Spec
Option 1: Zeal (every hit has a chance to do double DMG)
Option 2: Focus (+5% Spd), can also use Boost (+3% spd, dmg -2%)
Advanced Skill
Revitalising Wall (25% chance of healing when attacked - amount healed proportional to level). this is an IMPORTANT MUST HAVE skill if you want to survive in your dungeons. When you combine dmg reductions, this heal well exceeds the dmg done by enemy and heal you instead. You can stand in toto's spinning blades, Adracei's green poison thingy mabob, Talen's lava and even Zaahir's lava (up to level 80 Zaahir) and heal instead of lose hp.
ALWAYS KEEP THIS SKILL ON!!! with 50% spd, it will be a permanent buff, i.e. you can refresh it when it runs out. Although the healing ability says 10 seconds duration, it lasts for 20 seconds. Defense Spec
Option 1: Unyieldingness (recovers 1% of hp every second for 10 seconds, can only be activated every 30 seconds), this is where your HP pool comes in. If you have 40,000 HP (pretty likely at level 40-50 ish) you will heal 4000 HP every 30 seconds. Not that you need this when you have revitalising wall, but its reassuring as it acts as a safety net
Furthermore, you can get mastery upgrades which increases the heal time. Green Mastery increases heal to 15 seconds, every 30 seconds. This means you will be healing 1% of your MAX HP every second for half the time. Option 2: extreme speed (increases move spd), this will help you stay ahead of party and generate malice to group mobs together.
Option 3: courage (increases MAX HP and reduces DMG taken), this is unnecessary because of revitalising wall, but if you are having trouble, you might want to try this
Tactical Spec
Your choice really, depends on what your party uses as well. However, the following are more useful than the others.
Option 1: Organised Sabotage ( 25% chance to decrease target's DMG by 10%)
Option 2: Break Defence (25% chance to decrease target's DEF by 10%)
Option 3: Ambush (25% chance to decrease target's SPD by 10%)
Special Skills
Option 1: Best Defence (if lacking in def)
Option 2: Omniscience( if lacking in spd)
Option 3: Sky Shatterer (fortifies Cyclone Slash combo move, 40% chance to recover hp while being attacked for 10 seconds)
Note: Do NOT use Deep Blue, as it reduces your malice.
4. Gear
Reminder: The options that I list are in my order of preference, Option 1 > Option 2 > Option 3 and so on.
Armour
Go Full Requiem for armour (High boost to DEF, SPD, HP and EVA, preferably use Spidery or Guardian cores).If you find youself lacking in defense still, you might want to try to fortify your armours. If you fortify your armour pieces to +9, you will receive an additional -3% crit dmg taken. May not seem much but with 5 pieces, the effect will add up. At +15, you receive extra +2% malice from each piece, making a total of +10% malice. However, malice from skills and envoy should already be enough.
Leo Set for accessories (gives you huge boost to SPD and HP, bonus EVA but meh).
Trophies
Option 1: Lestaro's Mired Heart (yellow) - gives high boosts to SPD, HP and DEF....Being attacked has a 20% chance to recover 3% of MAX HP!!!! "can only occur 5 seconds". High HP pool strikes again
Option 2: Asheara's Magicked Scales (orange) - opportunity for core, high boost to SPD and DEF. HUGE HUGE HUGE bonus to HP
Option 3: Asheara's Crystal Scales (green) - high boost to SPD, HP and DEF
There are two trophy slots, so you may pick any 2 out of the 3 options. The orange and green Asheara's can be used together, the buffs stack because they're different items. Option 1 and Option 2 are recommended.
Weapons
At level 50, you have two main choices, Yellow or Crafted.
Guardian main weapon:
Option 1: Grass Kingdom's Sword of Bravery. It doesn't match my outfit but it has great stats, boosts DEF by additional 5%, increases Thunder cut's DMG by 25% and "every attack has 8% chance to recover 2648 HP"...which happens very often if you use tornado spin on a mob.
Option 2: Conqueror's sword and shield (orange crafted). Not recommended but if you have a spare weapon core that you think is good, feel free.
Ravager weapon:
Option 1: "The Decapitator" (orange crafted), it is recommended that you use a destroyer, shocking, protector or nocturnal core, it will be very beneficial to you.
Option 2: Halim's Mighty Strike (level 45 weapon, recipe can be obtained from main quest in Demerach Mines or from Class master) has substantial HP and Def boosts and a +5% Max HP.
Option 3: Giant Jordan's Axe (level 50 yellow) increases tornado spin range. It will also increase the damage you deal using ravager skills compared to the Halim's Mighty Strike but lacks the HP boost.
5. Eidolon
Coming Soon
Tips and Tricks
----------------------------------------------------
Helekar's Red Carpet
This proves fatal for many, and can possibly wipe you're entire party out in matters of seconds. It always agitates me when guardians do not know that they have the ability to completely block Helekar's star red carpet.
Star red carpet:

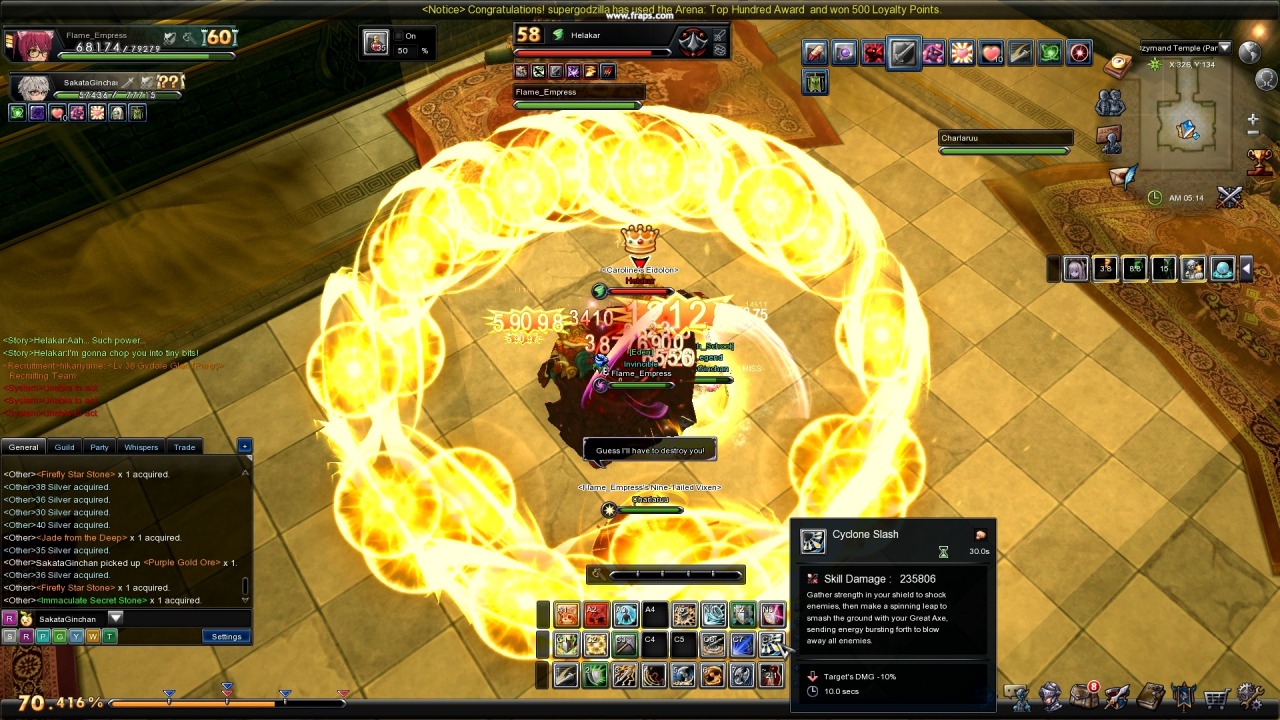
Well the trick is two easy steps:
1. Stand on Helekar
2. when you see star red carpet, hold absolute defence until the yellow circles are absorbed into your "absolute shield" and dissapear
Here's a rushed demonstration video: http://youtu.be/9g8I7dd-G3g (you might want o watch on the highest resolution)
and here's the exact video but from another angle: http://youtu.be/LR4mivqeFEc
----------------------------------------------------
Helekar's Red Carpet
This proves fatal for many, and can possibly wipe you're entire party out in matters of seconds. It always agitates me when guardians do not know that they have the ability to completely block Helekar's star red carpet.
Star red carpet:
Well the trick is two easy steps:
1. Stand on Helekar
2. when you see star red carpet, hold absolute defence until the yellow circles are absorbed into your "absolute shield" and dissapear
Here's a rushed demonstration video: http://youtu.be/9g8I7dd-G3g (you might want o watch on the highest resolution)
and here's the exact video but from another angle: http://youtu.be/LR4mivqeFEc
Credits: Special thanks to SkyPuppy for his time and effort making this guide.
0 Response to "Guardian/Ravager Ultimate PVE Tank Build and Strategy Guide in Aura Kingdom"
Post a Comment